CREATING TWITTER BIRD ON COREL DRAW
Creating Head
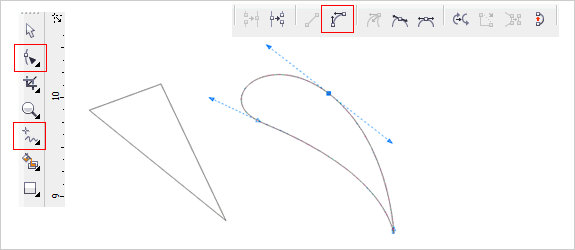
Draw a line, using freehand tool (F5) make it 35degree last node,
Use Shape Tool , you will see red line and small ribbon, drag everyside of the ribbon exactly like the image number 2
Then, make that line curve like this :
1. Using shape tool
2. Click on the middle of the line
3. Convert line to curve
Creating Tail
connect the last curve, with a new line.... not too straight, tilt it about 5 degrees
1. Using shape tool
2. Click on the middle of that new line
3. Convert line to curve
Body
Connect the first node to the last node, so that curve turn to "close curve" , what is "close curve" ? it mean that you can fill it with color, effects and so many thing. Or just press Auto-Close Curve. You see that the last node with the first node connected and automatic closed.
Now, create the curve for the body
1. Using shape tool
2. Click on the middle of that new line
3. Convert line to curve
Body Blue
As we know all, twitter has a distinctive color, blue. If the bird is brown, it's not twitter, it is BEKO-BEKO ! Hahahahaha. If you live in the city of Bogor, must know what it is BEKO-BEKO...;)
Use interactive fill >>
Choose Linear >>
(RGB) First color "SkyBlue", Second color " "Turqois" >>
Let the Fountain Fill Midpoint as default 50% >>
Fountain Fill Angle 140Degrees >>
Edge Pad 39%
The Eye
This bird has cute eyes , blue, black and white...;)
First, we create the Outer Layer of the Eye
Create a circle, fill color using interactive , as you see the image below,... follow all the linear fill parameter.
Lets we call it "Blue Eyes"
Now Create the second layer, Follow the step on the image below :
1. Create Big circle >> Fill it with black color
2. Create Medium and small circle, foloow the position as image below, fill it with white color.
3. Picture say thousand words , right? Hahaha... just take a look the image below, will you ?
4. GROUP IT.
Let say this "Black Eyes"
Now put the Black Eyes above the Blue Eyes
Make sure the black eyes is a group objects.
1. Select the black eyes, Hold "Shift" on keyboards
2. Select the blue eyes
3. Ctrl+A, it will show the pop up dialogue "Align and Distribute"
4. Check the vertical and horizontal "CENTER"
Or After you select the objects, just pres E then C
After the eyes finished, put that on the bird head......
Ok, Let see what we have so far.
The Hairs
This bird only have 2 hairs..... ;)
Do i have to write on this section..... come on,... just follow the instruction as the image below, it just repeated from previous section. if you cant follow the step, Go Up...;)
Hair Color
Follow the Linear Value/Parameter, as show on this image below, Duplicated the hair, and put it above the bird head
The MOUTH
First layer.
Create 4 side object like stealth ship , curve every side by using shape tool
Color it
Now we create the second layer of the bird mouth..
Countour >> Inside >> and the value is depend on first layer size., the most important is how you describe the deep of the bird mouth open
- Go to property bar >>Arrange >> Break Contour Group Appart (Ctrl+K)
- Then slide a bit result of the contour, close to the right, look like this :
Creating cavity of the throat,
make a circle, put it above the black mouth, Select the circle first, Hold "shift" on your keyboard, select the black mouth, then press "intersect".
The result of intersect, fill it with dark brown.
Then we creat tongue, so that bird can tweeeeeeeeeeet.
see the full mouth
what we have so far is :
The Wings
Most easy part is the wings
Color it using interactive fill then follow all the parameter on linear value
What we have so far ? She has wing now !
That's it Folk, Happy Nice Weekends !
Related Articles:


